Kids love scavenger hunts. Even at the age of three, most kids already know the concept of looking for clues which will eventually lead to a bounty of treasure. Mention a treasure hunt or scavenger hunt to a group of children and you’ll be rewarded with squeals of delight and eager faces.
And it’s not just for the young ones either. Although your teen won’t “squeal with delight,” I guarantee their fingers will at least stop mid-texting and if you’re lucky, you may even be rewarded with their eyes actually leaving the screen for a split second showing signs of curiosity and veiled interest.
So, for your next party, why not put together THE ULTIMATE scavenger hunt?
I know what you’re going to say. It’s too complicated. It’s too much effort. But I promise you, it’s really easy. I’ll show you that with very little effort, you’ll soon be an expert on how to create a scavenger hunt for kids, and guaranteed to make your next party a roaring success.
PLANNING STAGE
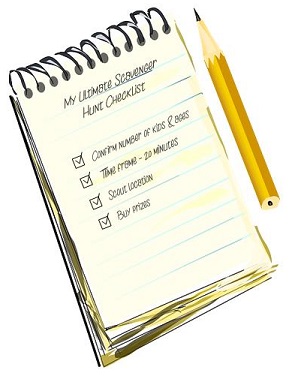
1) Determine the level of difficulty for the hunt
This is pretty obvious, but here’s what could happen when you forget this step. I was so caught up in creating all these creative princess-themed clues on pretty pink paper before realizing…oops, these are five-year-olds who can barely read. Lesson learnt: work out what the majority age group is and their reading level, and design a hunt with appropriate level of difficulty to suit.
For younger kids or beginner readers, I would suggest either recruiting a “reader” to tag along to read the clues or using picture-clues instead of words.
2) Determine time frame
A simple hunt will typically last around 15-20 minutes for 7-year-olds or younger, but can go for much longer for the older children. I have hunts that can last for an hour, but that’s because the hunt was for older kids and I had them go all around the neighborhood. It really just depends on your schedule of events and who the participants are.
But remember that younger kids have shorter attention spans. So if you want to make your hunt last longer, do so by using more clues, as opposed to making the clues more difficult to solve or find. Otherwise, they will get bored and give up.
3) Determine location and boundaries
Indoors or outdoors? Backyard or playground or some other location? If indoors, look around to make sure you don’t have any breakables, because scavengers can get pretty rowdy and rough. Unless it is a small group or your family, I always suggest hunts stay outdoors. Look around to make sure the hunt area is safe and identify any unsafe or off limit areas. Make a note of these boundaries so you can let the kids know later. If the kids are older, surprise them with a hunt that takes them all around the neighborhood.
4) Prepare the treasure
For a children’s party, I like to make the goody bags the treasure, secured and labeled with each child’s name, then put into a box and seal with tape. I then plan the treasure hunt to be the last party activity so they can have fun finding their own goody bags. However, the treasure can be anything. Just be sure that there is enough of it so no child misses out. It doesn’t have to be elaborate and certainly should not be expensive, but please make it “worthy” of the effort they put into finding it. Even a competitive hunt for older kids should include a small token gift for all participants.
CREATING YOUR HUNT
5) Find a cool location to hide the treasure
Make sure it is well-hidden and not someplace where someone can accidentally find it while playing around or hunting for the other clues.
6) Make a list of hiding places for each clue
List and number each location in order of how you want them found, with the last location being where the treasure is of course. Try to space locations appropriately so kids don’t accidentally find the wrong clue at a location which is too close to another.
7) Create the clues
Using your list above, write out each clue (or take photos), making sure that each clue leads to the next clue on the list.
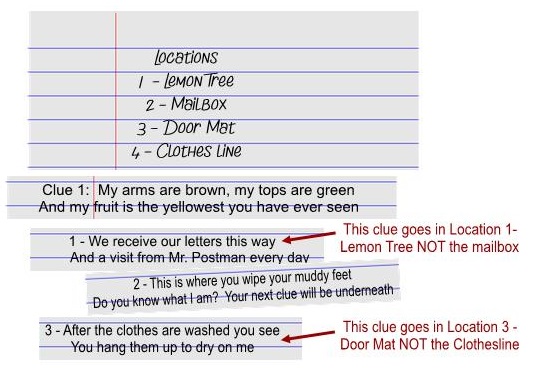
HELPFUL TIP: Some people make the mistake of putting the clue where the answer states. This would be incorrect. The clue pointing to one location should be placed in the previous location on the list. To avoid accidentally putting the clues in the wrong location, put the location number next to your clue during this planning stage, so you know exactly where to place them. This helps when you have a lot of clues. See how in our example below, the number next to the clue match the locations list, telling me WHERE each clue should be placed.
Level of difficulty for the clues depends on age group – the older the kids, the more complex the clues. Number of clues to use depends on length of hunt and difficulty of clues. However, on average, I usually end up with about 10-15 clues. This number also works with more difficult hunts where each clue takes longer to solve or find.
Word of advice: Some people tend to get bogged down with the clues. My suggestion is to keep it simple. Especially if this is your first hunt or for really young kids. Yes, rhyming clues are fun and clever, but not all clues have to rhyme. Some can be fill in the blanks, or a picture of part of an object. For themed events, simply mentioning a character in the clue gets a great response. E.G., This is where Rainbow Dash wipes her muddy feet on. Or, Elmo likes to hang up his clothes to dry on this. Get creative but don’t over-think it either.
8) Almost done! Now it’s time to hide the clues.
Use your best judgement. Don’t make it too easy to find, but don’t make it too difficult either. In general, young kids are not too observant. Once I thought I was being clever and stuck a clue on the lid of the mailbox, but when the kids lifted the lid, they only looked inside and found nothing there. It took several kids looking before one eventually noticed the clue stuck ON the lid and not sitting IN the mailbox. And it took all of my will power to bite my tongue and keep from shouting out “The lid! The lid!”
HUNTING DAY
9) Ground Rules.
Ground rules are a good way to kick off the hunt. It serves two purposes. It ensures that things go smoothly and minimizes tears or bad sportsmanship. But it is also an opportunity to build up the hunt and add some drama. Especially for themed parties – get theatrical! Here’s a sample of basic rules I use:
- This is all about teamwork and working together.
- This is not a race. You have to work as a team and help each other.
- No snatching clues from each other.
- It doesn’t matter if you don’t find any clues yourself because at the end, EVERYONE gets to share in the treasure!
- State off limit areas
- Other rules, depending on how you’ve modified your hunt.
- Anybody not playing by the rules will have to sit out.
10) Give the first clue and off a-hunting we go!
Kick-off the hunt by giving the first clue. You can simply read it out after the ground rules. Or for added drama, my favorite option is to challenge the birthday boy/girl to “win” the first clue. (I like to pick a game or activity they are good at or love, like the first to shoot 5 basketball hoops or who can keep the hula hoop going the longest, etc). When they win, you then reward them with the first clue.

And that’s it! Because of your preparations (admit it, they weren’t so bad, were they?) you can simply relax and enjoy watching the kids run around looking for their treasure. Oh wait – don’t forget the camera!
I hope you’ve found this guide helpful and I hope you really give this a go for your next party. I know the kids will really enjoy it. I have had a lot of success using this simple format and it is easy to modify to suit any party theme or age group. But if you really want to go crazy, you can also build on this to make it more complex by incorporating such things as puzzle challenges, physical challenges, or turning it into a competition with teams competing for the treasure. Really, the options are limitless.
But most of all, I hope you have fun, and HAPPY HUNTING!

